![]()
 Network traffic shaping is an interesting topic, that allows you to ensure that certain traffic gets priority over other traffic. When applied at the ISP level, this can get controversial, as you start getting into Network-Neutrality issues (where one company’s traffic gets priority over another company’s, which could lead to large media corporations silencing grassroots communication).
At the local network level, though, it means that you can ensure that certain traffic (like streaming Netflix videos) won’t be slowed down just because other, less important traffic (like an off-site backup job), is also flowing through your WAN connection. DD-WRT makes all of this possible (and not too difficult) on the NAT/QoS->QoS tab.
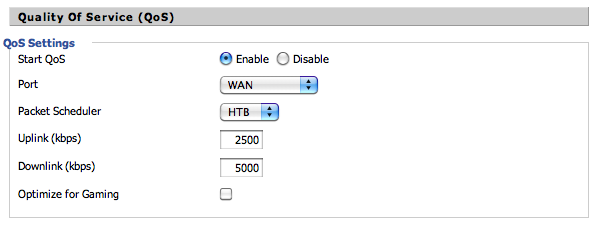
In the first section, titled ‘Quality of Service (QoS)’, set the following options:
- Start QoS => Enable
- Port => WAN
- Packet Scheduler => HTB
- Uplink => (whatever your ISP gives you for an uplink speed)
- Downlink => (whatever your ISP gives you for an downlink speed)
You may want to check out speedtest.net or a similar service to see what your uplink and downlink speeds are. If you can get this information from your ISP, that would be better, since the more accurate these values are, the better this will work. If you enter too high of a value, the shaping won’t kick in because the router will think that it has more bandwidth to paly with. If you choose too low of a value, you will end up wasting bandwidth, and your router will not use it all.
Now, if you only ever watch Netflix from a device that won’t be sending low-prioirty traffic as well (such as a Wii or Roku box), you can just enter that device’s MAC address in the MAC Priority section. Add the MAC address(es) and then select ‘Premium’ for the priority.
On the other hand, if you have a home server connected to your television, and you use this both as a file server (which runs off-site backup jobs to ensure your data is not lost in the event of fire, burglary, or other catastrophe) and as a media player, you will want more fine-grained control, since not all of the traffic to that device will have the same priority.
So, we will need to set up some Netmask Priority rules. This will give traffic to/from Netflix a higher than normal priority. Inspired by Jonathan Kamens, I first set my offsite backup (to Amazon’s S3 service) a lower than average priority. Then, I followed the same approach to itentify the subnet used by Netflix to stream their movies.
Using Little Snitch, I learned that Netflix uses LibSyn’s content-delivery network to stream the data. Specifically, I noticed a lot of traffic coming from netflix-380.vo.llnwd.net. Now, that server alone is not enough, because no doubt every time you connect, you will get a different server int he pool (like netflix-379…, netflix-381… etc). So, I got the IP address for this server using the ‘ping’ command:
[pkaeding@tripel:~] 22:35:43
% ping netflix-380.vo.llnwd.net
PING netflix-380.vo.llnwd.net (208.111.173.130): 56 data bytes
64 bytes from 208.111.173.130: icmp_seq=0 ttl=56 time=15.002 ms
64 bytes from 208.111.173.130: icmp_seq=1 ttl=56 time=16.956 ms
64 bytes from 208.111.173.130: icmp_seq=2 ttl=56 time=14.714 ms
Now that we have the IP address (208.111.173.130), we need to know what block of IP assignment it belongs to. IP addresses are assigned to companies in blocks, so it is a good bet that we want to prioritize all traffic to that network in the same way. The ‘whois’ command will help us learn this information:
[pkaeding@tripel:~] 20:26:16
% whois 208.111.173.130
GeekTools Whois Proxy v5.0.5 Ready.
Checking access for 67.174.196.72... ok.
Final results obtained from whois.arin.net.
Results:
#
# The following results may also be obtained via:
# http://whois.arin.net/rest/nets;q=208.111.173.130?showDetails=true&showARIN=false
#

NetRange:       208.111.128.0 - 208.111.191.255
CIDR:           208.111.128.0/18
OriginAS:       AS22822
NetName:        LLNW-3
...
What we are interested in is the ‘CIDR’ field. This is what refers to the block of IP Addresses that we are trying to prioritize. Go back to DD-WRT, and in the ‘Netmask Priority’ section, add an entry for this network. Then, assign it to the ‘Premium’ priority. (In the screenshot, you can see that I have the S3 network set to ‘Bulk’ as well as the Netflix traffic set to ‘Premium’.
In the end, I can watch movies while my 130GB photo collection is copied to Amazon’s cloud service!


10 Comments