A hopback allows you to hop your brew just before cooling it. The advantages here are, of course, the ability to add hop flavor, without adding bitterness. This is a somewhat similar result to dry-hopping.
I decided to build a hopback when I bought a plate chiller. I was dissatisfied with my immersion chiller, which I felt took to long to cool the wort. So, I bought a plate chiller, which is a smaller version of what the big breweries use. Basically, you have cold water running between copper plates counterflow to your wort.
When I was doing some research about plate chillers, I found that it was good to put a hopback in the line before them, after your brew kettle. This will keep the hop solids and hot break from clogging the plate chiller.
I found a couple of websites explaining how to make a hop back, so I read them , got some ideas, and then made my own. Here are my notes on how I made mine.
[ad]
My concept is based on this idea, where
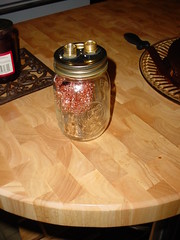 you push the boiling hot wort into a Mason jar filled with hop plugs, and then, when the jar fills up with wort, the wort is let out through another tube, which leads to the plate chiller.
I started with a Mason jar, and I used a large bore drill bit to drill a hole in it. I needed to make a hole big enough to fit my brass fitting for my tubing. So, I made a big hole, and the drill bit made lots of burrs. It was a mess.
I bought another mason jar, and drilled the holes more carefully. I then tried to solder the brass fitting on with a blowtorch and silver plumbers’ solder. I figured silver plumbers’ solder would be appropriate, since if it’s good enough for drinking water, its good enough for beer. What I wasn’t counting on was the plastic gasket coating on the bottom of the mason jar lid melting. So, I went back to the hardware store, and bought another Mason jar.
Finally, I decided to trace the outline of my brass fitting with a Sharpie marker, and cut the holes out with an Xacto knife. Bingo. I got just the size holes I needed, with no burrs.
Instead of soldering, I used rubber washers as gaskets, and screwed the brass fittings on. I just bought some rubber washers from the local hardware store, so I don’t know if they were food-grade of anything, but I ran some hot water through it when I finished, and, of course, I run sanitizer though the whole set up whenever I use it.
After I set everything up, I hooked up my hoses, and tried to run some hot water through it.
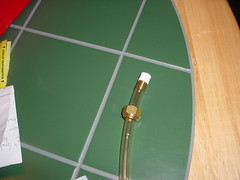
Lo and behold, all of the connections leaked. I then put some Teflon pipe thread tape on the connections, and tried again. That seemed to do the trick.
So, Teflon was the answer. Since then, I’ve made a few brews with this setup, and everything seems to go well.
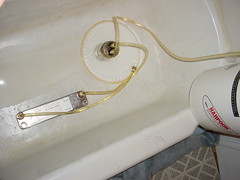
Below is a photo of my whole setup, with Idophor sanitizer running through it, before I made my APA/Hefeweizen hybrid brew.
I have also made an Apple Ale with this setup, and it works great. I have to say, as much fun as it is creating new homebrew equipment, it is much more fun using it, and having it work.
A brew buddy and I actually spent a whole day working out the logistics of this contraption, and we had to delay brewing. When I actually brewed with it, and saw the 200o+ wort flowing in, and the ~65o F wort flowing out of the chiller, it was all worth it.
When I tasted the beer, it was really worth it.
I use the hopback on every brew, even if I’m not making a hoppy beer. In that case, I will just leave the hops out, and use the hopback as a sort-of filter to trap any sediment before the wort flows into my plate chiller. Below is a diagram of how the whole thing goes together.

2 Comments