So, I just made my first all-grain brew a few days ago. Needless to say, I wasn’t really sure how to do it, so here is what I did. Maybe it will help you out. I learned most of the information here from the guy at the Modern Homebrew Emporium in Cambridge, and [amazon-product type=text text=”Homebrewing Guide”]0882669052[/amazon-product] by Dave Miller. I am describing the step-mashing process, which is one of a few different popular methods. If you’ve tried one of the other methods, I’d love to hear about it.
This process will add a few hours on to your brew time, and really make it into an all-day activity, but it will give you much more control and satisfaction over the end product. And, anyway, you don’t brew your own beer because it’s easy, right?
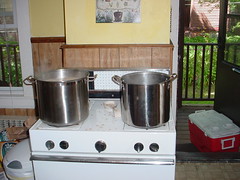 I am assuming that you know how to do a basic extract-based brew, so I will just focus on the mashing process. After that point, it is the same process, except that you will have to boil more liquid. If you have a pot big enough to hold your whole batch, then you are all set. However, you may have to split your batch into two pots, like I did.
[ad]
You will also need more water total, since more will end up boiling off. According to Homebrewing Guide, you should have twice as much water as the final batch size. So, if you are making five gallons of beer, start with ten gallons of water. I actually found that I used all ten gallons, so I would recommend having at least eleven gallons on hand. You don’t want to run out of water, and it won’t go bad, so if you don’t use it, you can save if for next time.
The process consists of three main steps, the mash-in, the mash-out and the sparging.
Mash-In
Start by boiling some water. Use 1 gallon for every 3 pounds of grain.
- Heat the water to about 135oo Fahrenheit, but
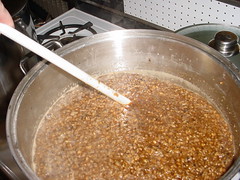 the extra few degrees will help keep the mash at the right temperature for the full 30 minutes. Fahrenheit. Mix in the grain, and let it sit for 30 minutes. If you are using two pots, do your best to make the mixture equally thick in each pot. This is called a protein rest, and it helps release the enzymes that will convert the complex starches into simple sugars the yeast can eat. The ideal temperature for this is about 130
 - Next, you want to boost the mash to the starch conversion temperature, which is in the 150o – 155o Fahrenheit range. Use short bursts of heat, and stir constantly to avoid burning the grain. I used bursts of 1 – 2 minutes, alternating brew pots. So, each pot was 1 – 2 minutes on, 1 – 2 minutes off. You are trying to raise the temperature slowly, at about 1o – 2o per minute.
- On the way to the starch conversion temperature, you may want to rest for about 15 minutes at 140o Fahrenheit to help increase the fermentability of your wort.
Once you reach the starch conversion temperature, rest for about 15 minutes.
Mash-Out
The mash-out process is meant to kill the enzymes so that they don’t keep working after you have converted the starch. Boost the temperature to 160o – 165o Fahrenheit, using the same burst method as before. You can go a little more quickly this time, but be sure not to burn it.
Sparging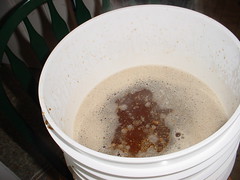 The sparging process separates the wort from the spent grains. You will need a lauter tun for this step, which you can make by drilling hundreds of holes into a 6 gallon food-grade plastic bucket, and nesting it inside your bottling bucket.
- You will want to have a few gallons of sparge water ready before you begin this step. Heat the water to 163o
Fahrenheit. Pour some sparge water into your lauter tun so that it comes up to just over the false bottom of the inner bucket. - Pour the mash into the lauter tun. Be very careful when you do this. I’m sure I don’t have to tell you what will happen if you spill the pot and dump five gallons of 165o Fahrenheit liquid on yourself. The pot will be heavy. Be ready.
- Stir the mash in the lauter tun, and let it sit for about 15 minutes. This will give the grains a chance to settle to the bottom, where they will start to form a filter on top of the false bottom.
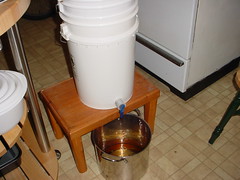
- Pour some wort through the spigot in the bottling bucket into a pitcher, and pour it pack on top of the mash. Pour it slowly, about one quart per 1 – 2 minutes. Keep doing this for about 15 minutes, until the wort begins to clear. It won’t be perfectly clear, but you will see what I mean. Ideally in this step, you wouldn’t use a pitcher, but another vessel with a spout, called a grant. This would allow you to keep the spigot open on the lauter tun, maintaining suction on the filter bed. However, I didn’t have anything like this, so I just opened and closed the spigot.
- When the wort coming out of the lauter tun is clear, you can begin running it off into your brew kettle(s). Continue to do this slowly.
- When the wort in the lauter tun gets to be 1″ – 2″ above the filter bed made from the grains, begin sparging. Sparging is
 simply pouring the sparge water into the top if the lauter tun, at approximately the same rat that it is pouring out the spigot. You want to keep the level of wort more or less constant. You should also be careful when pouring the sparge water to be sure you don’t cut into the filter. Move the stream around in a random pattern. This sparging process should take at least 45 minutes. If you do it more quickly, your extraction efficiency will suffer.
At this point, you have finished the mash process, and you are at the point where you would have started if you were using malt extract.
I hope you find this information useful. If you would like more information, I think the best way to learn is by helping a friend who knows how to do it. Barring that, I would recommend Homebrewing Guide by Dave Miller. I have also heard very good things about The Complete Joy of Homebrewing
by Charles Papazian.
2 Comments